Integration with the Azure IoT Hub

Written by Matthew Clark-Massera
Updated at July 1st, 2025
Table of Contents
Our Choosing an Integration Strategy article covers the different ways to receive device data.
Some users wish to make use of the Azure IoT Hub to receive data.
Device Manager supports this via the use of the HTTP Connector (option 3 in the integration strategy article)
Typical IoT Hub Requirements
These requirements can vary and the user must check on their side.
This is not an exhaustive list, just what we have accommodated in the past.
- Data sent in the form of an HTTP POST
- Application/json header
- Header containing the hub name.
- Per device authentication tokens
- Posting to specific URLs based upon the device serial.
The HTTP Connector in Device Manager
In order to achieve the requirements Digital Matter simply sets the connector up to send a HTTP POST to a provide URL each time the device uploads data to Device Manager - it will be forwarded on.
The server should respond with HTTP OK (200)
Additional fields, features can be configured to facilitate sending data to the IoT Hub including:
Dynamic Fields
[SERIAL] - Device Serial
[CUSTOM1], [CUSTOM2], [CUSTOM3] - these values can be loaded in to the Device Manager Database against device serials via the Device Manager API or via the HubHelper app (see below)
Headers
Multiple headers can be sent with the POST.
Integration
Custom fields need to be configured on the device for the integration to function properly with the connector:
[CUSTOM1] = Device name (from the IoT hub, when you create devices, they're all assigned names)
[CUSTOM2] = hub name
[CUSTOM3] = per device SaS token.
The IoTHub Helper app simplifies and streamlines the process of setting custom fields for the user, and is the recommended approach
IoTHub Helper
Set up in Device Manager.
Set your device(s) connector to:
HTTP_Azure_IOTHub
Azure-IoT Hub Helper User Interface/Instructions
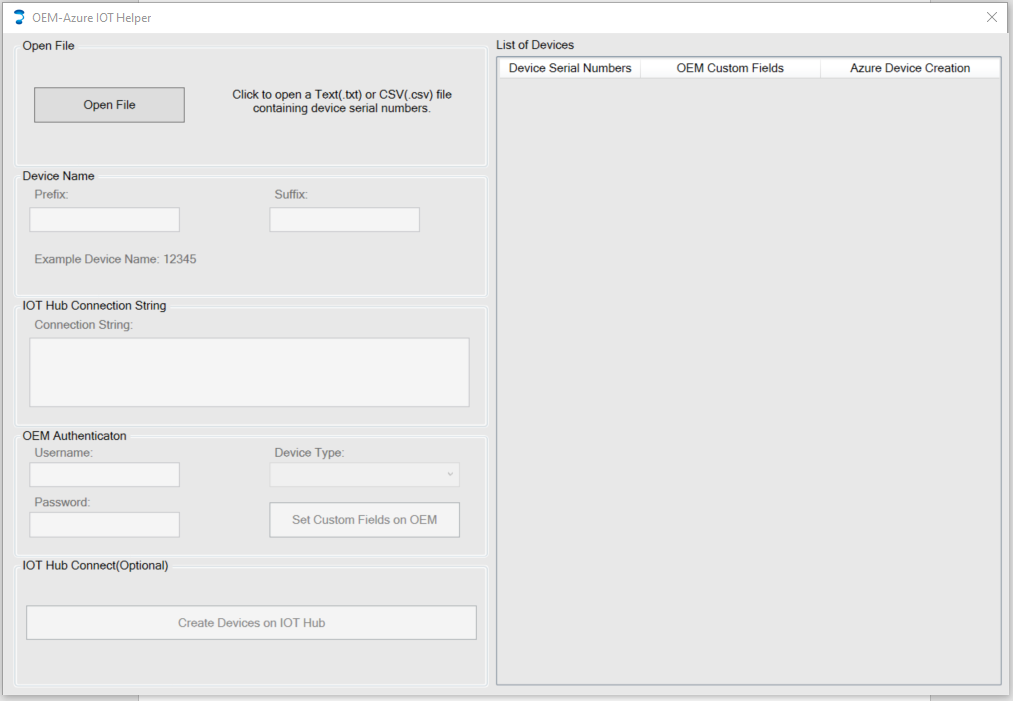
Open File – Opens up a dialog that lets you select a comma-separated value (.csv) file or a text (.txt) file containing a list of serial numbers of a single type of device. The application can only read serial numbers from CSV files and Text files, so ensure the files are in the correct format.
Device Name – Allows customization of the device name by either adding a prefix or suffix to the serial number. An example of how the device name will appear alongside “Example Device Name”.
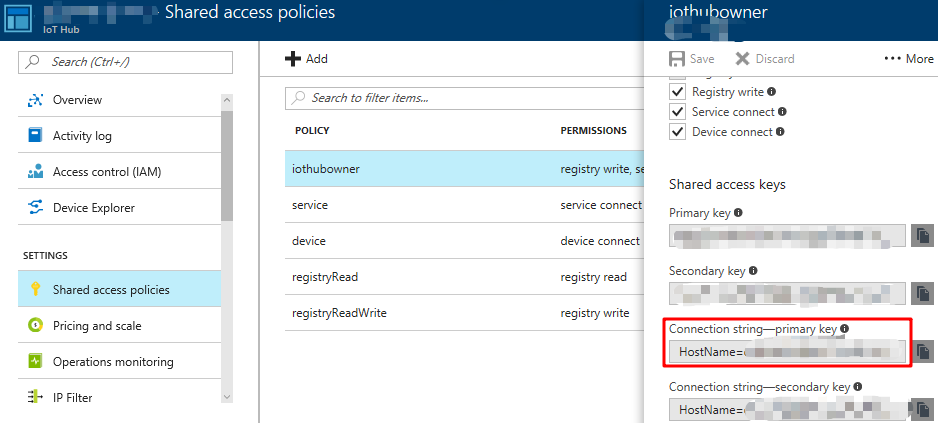
IoT Hub Connection String – This is a connection that can be found in your Azure IoT Hub
To find the connection string:
- Navigate to shared access policies under settings
- Select the iothubowner under the policy heading
- Copy the connection string with the format:
HostName=<Host Name>;SharedAccessKeyName=<Key Name>;SharedAccessKey=<SAS Key>
OEM Authentication – Enter your credentials you use to log in to Device Manager and select the device type, this will generate the custom hidden keys which are saved on Device Manager for each device.
IoT Hub Connect – Create the devices on your Azure IoT Hub, this is an optional feature and isn’t required. If a device with the same name already exists on the Hub, the device will not be created.
List of Devices – A display of all serial numbers that have been found in the file, along with the status of each device as you generate custom fields along with creation of the device on Azure.
FAQ
- The application only allows customization of a single device type, so all the serial numbers present in the file will have to be of the same device type.
- Changing the device name after custom fields have been set, will require the custom fields being generated again by pressing the “Set Custom Fields on OEM” button.
- An incorrect serial number will not have its custom field set nor will it be set if the device type is incorrect.
- Incorrect credentials or incorrect IoT Hub connection string will result in custom fields not being set and inability to add devices to Azure IoT Hub.
- The status of a device will be indicated alongside the device in the view on the right.
- The token set on the app has a one year expiration date applied to it.