Oyster Sigfox Config App
As discussed in this article, the Windows config application with the USB adapter cable is one of two options for changing settings and updating firmware on the Oyster Sigfox device. This article gives more detail on how to install and use the application.
Before you start:
You will need:
- An Oyster Config Adapter from Digital Matter. This is a USB to Serial cable with the Oyster's plug on the end. Plug the USB end into a Windows PC. Windows should automatically install an FTDI driver for the cable.
- Note the COM port assigned to the cable. This can be found in Device Manager, under Ports.
Install the Oyster Sigfox Configuration Tool:
- Download the config application from here.
- Double click on the downloaded setup.exe to install the application.
- If the installer doesn't work for you, see this article.

Using the application:
- Run the application: search for it in the start menu and run it.
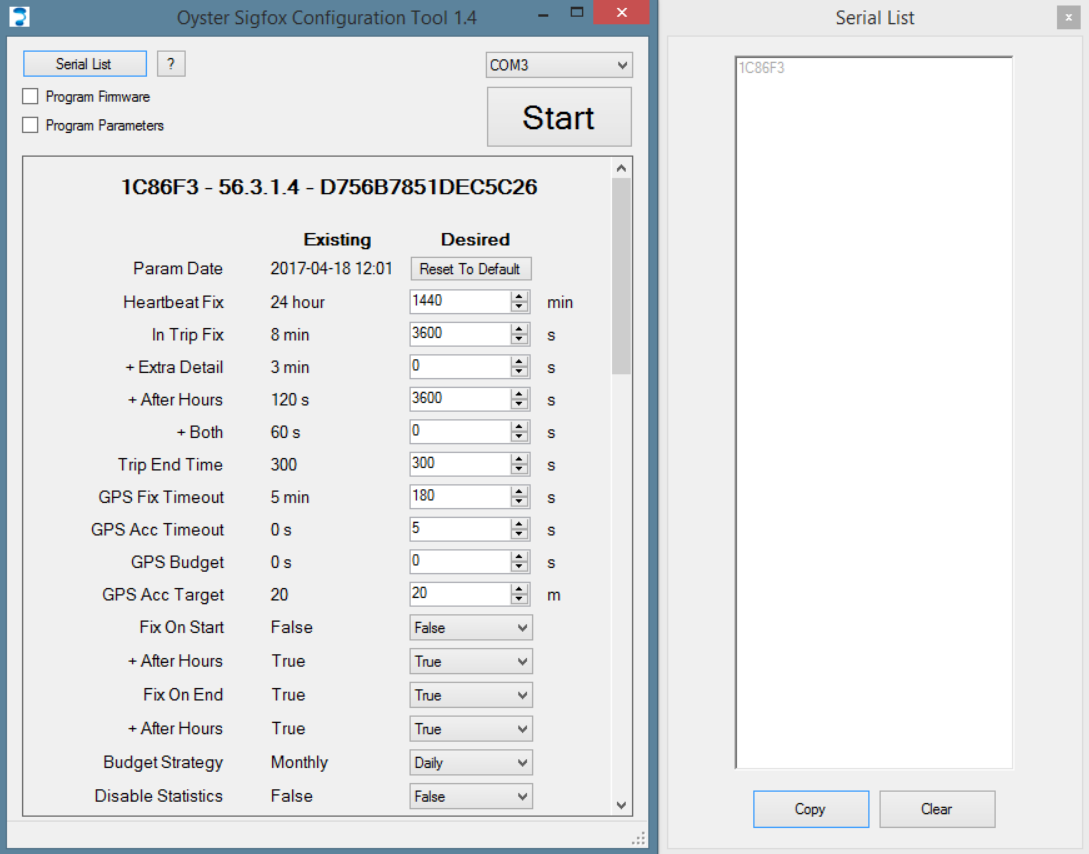
- Select the USB adapter's com port from the drop down in the top right of the application.
- To update any connected Oyster's firmware to the latest version, tick the Program Firmware box. Leaving the box un-ticked will not update the firmware.
- To update the parameters on the device, tick the Program Parameters box. Leaving the box un-ticked will leave the Oysters parameters unchanged, but will allow you to view the settings.
- Click Start
- Plug the adapter into an Oyster.
- If the adapter has 3 wires (no red wire), insert batteries in the Oyster.
- If the Oyster is recognized, the following details will appear:
- Sigfox ID: 1C86F3 in the example above.
- Firmware version: 56.3.1.4 in the example above. If an update is pending, a * will appear next to the version
- The original PAC code. This may change if the device has already been added to the Sigfox backend.
- The Existing settings column will be populated with the settings that are currently on the device.
Updating parameters:
- Ensure the application is "stopped". Click Stop, or if freshly opened, do not click Start.
- Tick the Program Parameters checkbox.
- Select the required parameters in the Desired column.
- Click Start.
- Plug in the Oyster. If necessary, insert the batteries.
- The ID should appear. The settings will be sent and the Oyster will reset.
- The ID will appear again, and the Existing settings will match the Desired settings.
- Remove the cable from the Oyster and insert it into the next one. No need to click Stop in between.
For a discussion of the parameters, see this article.
Notes:
- Which firmware version is the latest? A firmware version is embedded in the application. It matches the applications version (eg 1.4 above). Download a newer config application to get a newer version of firmware.
- The latest version of the config application will automatically check for updates each time you run it, so long as you are connected to the internet.
