Connect 1-Wire Keypad to a Wired Device

Written by Matthew Clark-Massera
Updated at September 29th, 2026
Table of Contents
Applies to:
| Device | Firmware Version |
| Arrow Global BLE | All Versions |
| Dart3-2G and Dart3-4G / Dart3-4G-BLE | All Versions |
| G120-2G and G120-4G | All Versions |
| G70-2G and G70-4G / G70-4G-BLE | All Versions |
| G150 Global | All Versions |
1-wire iButton keypads can be connected to a DM device. This provides an option for where a keypad is required instead of a swipe fob/access card. Some organisations prefer this as cards/fobs do not need to be distributed.
Check Datasheet Carefully
This guide is based upon feedback from DM Partners and what has worked on specific keypad models. Please check the keypad datasheet carefully, as this product is not supplied by DM some elements may change in the future (i.e. wiring colours)
Tracking Hardware: EC-19521 10 Digit Keypad
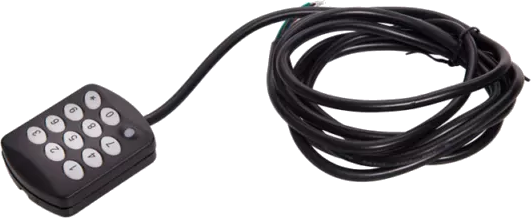
Tracking Hardware: DC-51145 IP65 Keypad

Tracking Hardware: TC-261048 – 5-Key Driver Identification Keypad

Tracking Hardware: STL-1307 - IP68 Driver Identification Keypad

Keypad Supplier
-
Tracking Hardware
- UK Based
- Ship globally
Wiring + Parameters
Arrow Global BLE
| Wire Name | KeyPad Wire Colour | Function | Connect to Arrow Global BLE Wire Colour |
|---|---|---|---|
| iButton Signal | White | iButton Signal Line | Connect to Arrow Global BLE iButton Line Brown |
| Power | Yellow | Powering Keypad | Vehicle Power Check voltage spec on Datasheet Carefully 8-36V model Must be powered externally to Arrow Global BLE |
| Ground | Brown | Ground | Chassis or Arrow Global BLE Ground (Black) |
| Keypad Buzzer | Green | Buzzer control when Arrow ignition on (if configured) | Switched Ground Digital Output (Yellow) |
Parameters
Set the 2-wire function to 'iButton/Digital Input' and the poll iButton to ‘Yes’

Dart3
| Wire Name | KeyPad Wire Colour | Function | Connect to Dart3 Wire Colour |
|---|---|---|---|
| iButton Signal | White | iButton Signal Line | Connect to Dart3 iButton Line Brown, Pin 10 |
| Power | Yellow | Powering Keypad | Vehicle Power Check voltage spec on Datasheet Carefully 8-36V model Must be powered externally to Dart3 |
| Ground | Brown | Ground | Chassis or Dart3 Ground (Black) |
| Keypad Buzzer | Green | Buzzer control when Dart3 ignition on (if configured) | Switched Ground Digital Output (Yellow) |
Parameters
1. Set 4-Wire Plug function to Button
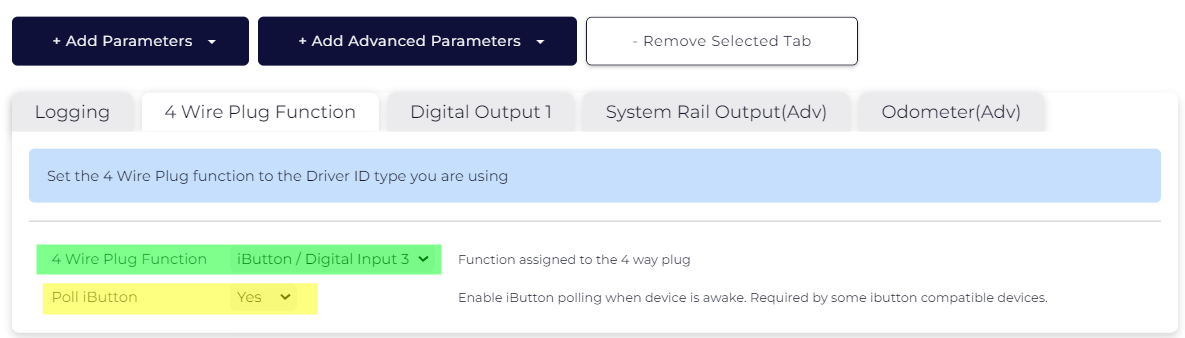
Poll iButton may need to be set to “Yes” depending on the device.
G120
| Wire Name | KeyPad Wire Colour | Function | Connect to G120 Wire Colour |
|---|---|---|---|
| iButton Signal | White | iButton Signal Line | Connect to G120 Green (pin 13) and Brown (pin 14) |
| Power | Yellow | Powering Keypad | Vehicle Power Check voltage spec on Datasheet Carefully 8-36V model Must be powered externally to device |
| Ground | Brown | Ground | Chassis or G120 Ground (Black) |
| Keypad Buzzer | Green | Buzzer control when G120 ignition on (if configured) | Switched Ground Digital Output (Green) |
Parameters
1. Ensure 4 wire plug function is set to iButton, and Poll iButton = Yes
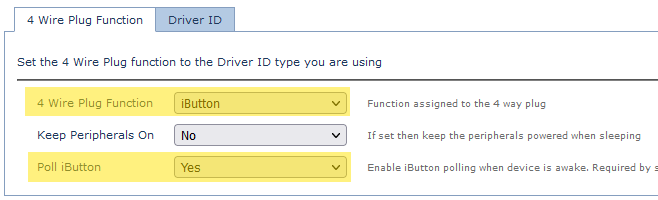
This is the only step required to read codes from the keypad.
G70
| Wire Name | KeyPad Wire Colour | Function | Connect to G70 Wire Colour |
|---|---|---|---|
| iButton Signal | White | iButton Signal Line |
Connect to G70 iButton Line
|
| Power | Yellow | Powering Keypad | Vehicle Power Check voltage spec on Datasheet Carefully 8-36V model Must be powered externally to device |
| Ground | Brown | Ground | Chassis or Device Ground (black) |
| Keypad Buzzer | Green | Buzzer control when G70 ignition on (if configured) | Switched Ground Digital Output (Green) |
Parameters
1. Set 4-Wire Plug function to iButton
Poll iButton may need to be set to “Yes” depending on the device.
G150
| Wire Name | KeyPad Wire Colour | Function | Connect to G150 Wire Colour |
|---|---|---|---|
| iButton Signal | White | iButton Signal Line | Connect to G150 Brown (pin 6) and Purple (pin 7) |
| Power | Yellow | Powering Keypad | Vehicle Power Check voltage spec on Datasheet Carefully 8-36V model Must be powered externally to device |
| Ground | Brown | Ground | Chassis or G150 Ground (Black) |
| Keypad Buzzer | Green | Buzzer control when G10 ignition on (if configured) | Switched Ground Digital Output (Green) |
Parameters
Set 4-Wire Plug function to iButton

Configuring Buzzing
The keypad has an internal buzzer. However it is activated by applying 12V to the buzzer control line. There is no 12V output available on the wired devices - so instead it is easiest to instead Connect an External Buzzer.
Ensure this parameter is set to have the buzzer sound when a trip is started and no PIN is entered

Immobilisation
See Immobiliser Install - Asset starts after valid Driver ID Scan
Driver ID in Telematics Guru
To enter driver codes in TG,
- Admin → Drivers
- Create a new Driver
- Enter the Driver Details, the ID Type is 'iButton', and enter the code with leading 0's to make 12 digits.
- Use a Decimal to Hexadecimal Converter to obtain the hex.
i.e. keypad code 1234 = 0000000004D2


Read more about adding Drivers to TG here.
A successful read in Device Manager looks similar to this (Debugging turned on, Dart3-4g-BLE); note that this is returning the default ‘Short Identifier’ format (000004d2). This is covered in the link shared directly above.

A successful read in Telematics Guru Telemetry looks like this:

