Upload Timeouts - Network Registration Strategy
About network settings for our Cat-M1 and NB-IoT device range.

Written by Matthew Clark-Massera
Updated at October 29th, 2025
Table of Contents
Applies to (Cat-M1/NB-IOT device range):
| Device | Firmware Version |
|---|---|
| Barra GPS | All Versions |
| Barra Core | All Versions |
| Barra Edge | All Versions |
| Barra Recovery | All Versions |
| Oyster3 4G | All Versions |
| Oyster3 4G Bluetooth | All Versions |
| Oyster Edge 4G | All Versions |
| Yabby3 | All Versions |
| Yabby Edge | 1.12+ |
| Remora3 | All Versions |
| Hawk Pro/Hawk Lite | All Versions |
| Manta Fusion | All Versions |
| Manta Fusion Global | All Versions |
| Manta GPS CATMNB | All Versions |
For information specific to our global range, see Network Settings - Global Devices.
A failed upload uses up to 20 times the power of a successful upload. This is because a failed upload scans the bands for 3 minutes (registration timeout), while a successful upload is typically done within 5 – 10 seconds.
A failed upload is a complete waste of energy!
Saving Power - Early Cellular Registration Abort.
Our LTE-M/NB-IoT battery-powered cellular devices, which use the Nordic nrf9160 can detect early when the device is out of coverage, and quit the upload early - saving a heap of power!
The modem tells us when it has done a “best guess” scan of the bands, and when it has finished scanning all the bands, so we have added a new registration strategy option to the upload parameters:
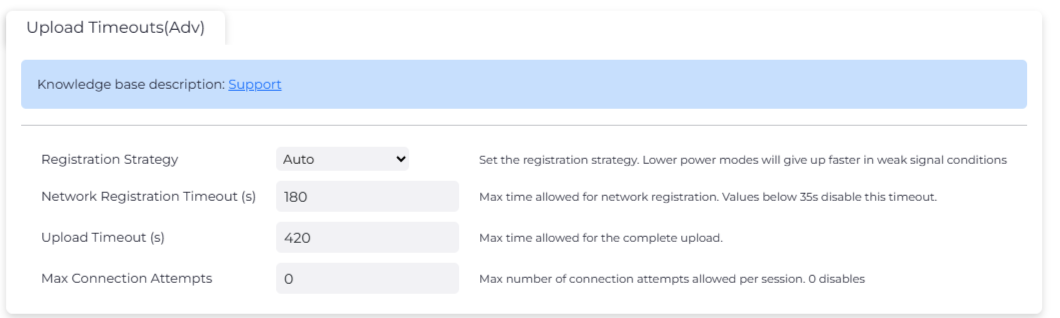
Auto (Default)
When connecting to the network, the device can identify if it is a 'local' or roaming SIM card.
- If we are on a Local SIM, it sets the profile to Ultra-Low Power.
- If a Roaming SIM is detected, it sets the profile to Balanced.
The firmware identifies if CEREG =1 or CEREG =5.
CEREG = 1 means it is a Local sim, and CEREG = 5 means it is registered roaming.
Balanced
In balanced mode, the device simply uses the network registration timeout (default of 3 min) This is the recommended mode when using roaming sims, with a device roaming between countries. Especially multi IMSI roaming sims which typically need to be powered long enough to change the IMSI (E.G multi IMSI Emnify sims require this timeout to be 5 minutes).
For more information on the impact roaming sims have on battery life, please see:
Low Power
In this mode, the device aborts the upload attempt when it has finished scanning all the bands and has not found a suitable network. This mode works best when there are fewer bands enabled - this can be done by Setting the Network Profile to limit the bands which are scanned.
For example, with the bands limited to Telstra CAT-M1 and NB-IoT bands, this timeout triggers after 40 seconds which is 5x shorter than the default 180 seconds. With all bands enabled this generally takes 2 minutes so there is only a marginal power saving.
In this mode, setting the bands is important to maximise battery savings.
Ultra Low Power
In this mode, the modem tells us when it has done a “best guess” scan. Essentially it uses information about the network such as the last successful band it used to abort early, typically within 5 – 10 seconds. This setting is the best for battery life, but you run the risk of prematurely failing uploads if cell coverage is marginal.
This option makes failed uploads comparable in power to successful uploads, but it comes at the sacrifice of upload reliability when on the edge of coverage. This option would not be recommended for roaming sims that switch between carriers.
This an excellent option for deployments where the cell signal is reliable, and where you are able to set the bands.
Which to choose?
Most users will see great results with the default parameters. In addition, it is highly important to set your network profile for best results.
If you are frequently experiencing failed uploads, you could try setting the plan to Balanced. The device will use more energy but may get online more easily if it is on the edge of coverage.
If you are using a roaming SIM card, but it only ever resides in one country, you could try the Low Power or Ultra-Low power options to save some energy (however take care and test thoroughly). It is definitely a sensible idea to set band masks in this case as well.