Alert Notifications through WebHooks
Learn how to create automated alerts and notifications using WebHooks.

Written by Matthew Clark-Massera
Updated at April 10th, 2026
Table of Contents
What are WebHooks?
WebHooks are a way that one application can send a message to another.
So when something happens in one app - it triggers a WebHook to send some data to another - and the other app can use this data and perform other actions if necessary. It is an example of a 'push' message as based on an event, Telematics Guru will push some data to another system.
What are the applications/why would I use them?
In Telematics Guru - the way WebHooks are implemented is essentially a URL can be the recipient of an Alert Notification.
So when an alert is triggered in TG - some information is sent to that server in the form of a HTTP post.
This is useful when Telematics Guru is being used as the tracking platform - but a user has some other system which they need some of the telemetry data. There is no cost for this service, it is included in the TG asset fees.
Examples:
- An organisation uses TG for their asset tracking and driver behaviour monitoring. They also use a hiring or maintenance software. This system requires updates of asset run hours and odometer values, which TG and DM devices keep track of. The WebHook is configured such that at the end of a trip, the Odo/Run Hour value for the asset is sent from TG via HTTP post to this system.
- Duress or other alerts can be integrated into a monitoring or ticketing system - to trigger follow up actions when they occur.
If two systems need to be used in parallel and more than a few data points are required (or even all the live data) - it is best to use the multi connector option (see here) - to have device data sent to both TG and the 3rd party platform simultaneously.
WebHooks in TG - Set Up
It is possible to get alert notifications via HTTP post. The alert service expects a 2XX HTTP response code to mark the alert as processed. Web hooks can be configured by users.
In order to configure the Webhook, a user will need the Webhook Manage permission on their user account.
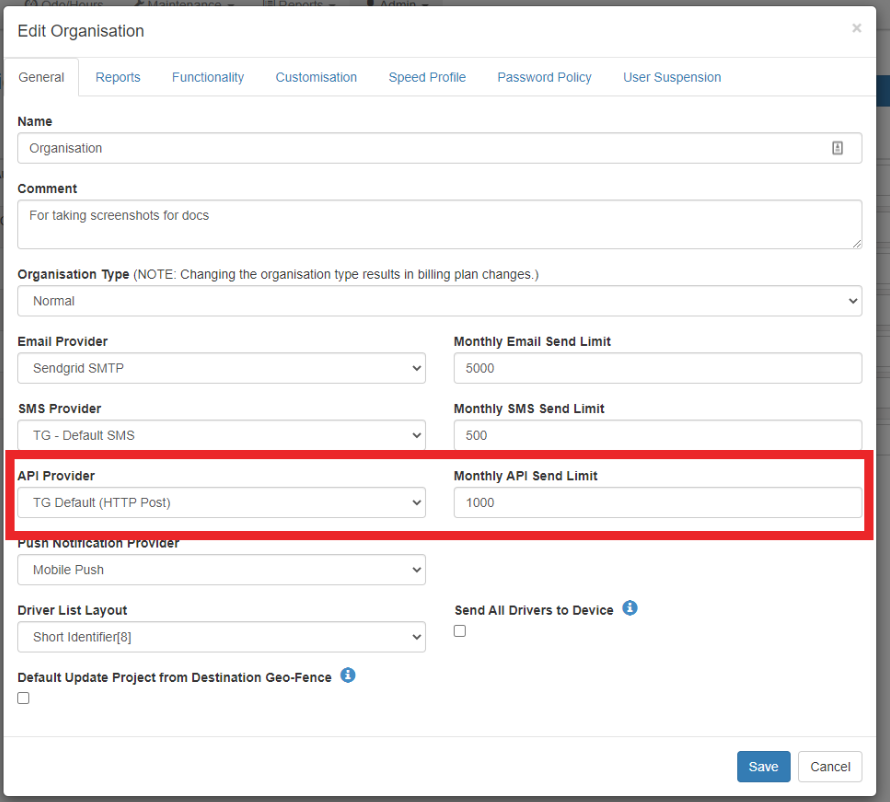
1. Enable Webhooks for the organisation.
Admin → Organisation Manage → Organisations → Edit.
Set the API Provider to TG Default (HTTP Post)
Select a send limit that makes sense for your use case and number of assets. The send limit is to prevent potentially misconfigured webhooks, or other issues generating thousands of alerts.
2. Configure The Webhook
Users with the Webhook Manage permission can configure the webhook via Admin → Web Hooks
Webhooks are set up on a per-org basis (just like alerts).
2.1 Create a New Webhook

2.2 Give the Webhook a name and description
No specific requirements, this can be whatever makes sense

2.3 Enter URL, Headers and Body

On the details tab, enter the URL, any headers, and the webhook body.
Add Token will bring up the list of available tokens,
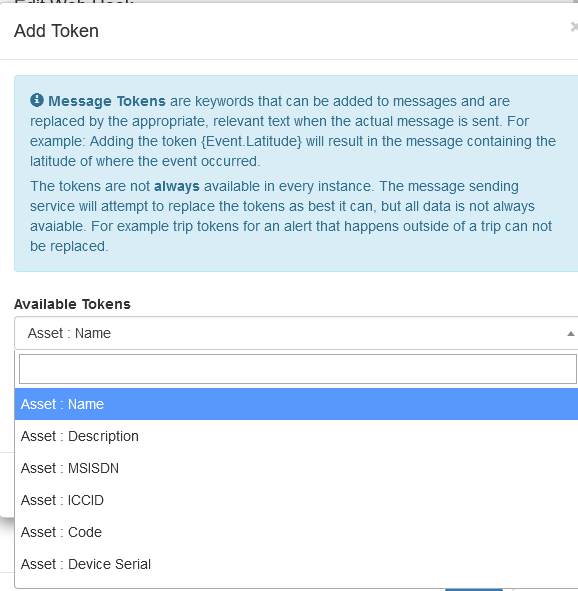
These are dynamic fields based on the device data. The data from whichever device generated the webhook will be included.
2.4 Testing
The Test tab allows us to preview and test the generated webhook. Tokens are filled with Generic data, i.e. "Joe's Crane".
Edit Tokens lets us the token data.
Pressing Execute will send the webhook and return the response from the end server.

4. Set the Webhook as the recipient of an alert
We set up the webhook to send data on an event occuring. So we can send the webhook data based upon any conditions we can alert on. We simply configure an alert as normal, and under the "Notification" section, set the webhook as an address to send the alert to.

Tokens, how do they work?
Not all tokens exist at all times.
For example, {Trip.Driver}, is empty if we're not in a trip. There is no current driver if there is no current trip.
So, if we need a certain piece of Trip related data pushed, the Alert which we configure in the following steps needs to fire during a trip.
So, we need to consider our tokens when setting up the alert conditions. Contact Support if you have trouble.
5. Testing and Debugging
To aid in testing/debugging, we have a couple of key options.
- Initially, we could set up the Webhook on an alert we have easy control of - such as an Ignition On alert - while we have a device on our desk which we can ignition on/off by applying voltage to the ignition line to trigger alerts.
- During testing, send the webhook data to an endpoint that requires no authorisation (e.g. RequestBin) - so we can inspect the body and be sure all authorisation headers etc are being correctly formatted.
Available Tokens
| Category | Label | Token |
|---|---|---|
| Asset | Asset ID | {Asset.AssetId} |
| Asset | Asset Type | {Asset.AssetType} |
| Asset | Chassis Number | {Asset.ChassisNumber} |
| Asset | Code | {Asset.AssetCode} |
| Asset | Colour | {Asset.Colour} |
| Asset | Department | {Asset.Department} |
| Asset | Department Code | {Asset.DepartmentCode} |
| Asset | Description | {Asset.Description} |
| Asset | Device Serial | {Asset.DeviceSerial} |
| Asset | Device Type | {Asset.DeviceType} |
| Asset | Engine Capacity | {Asset.EngineCapacity} |
| Asset | Engine Number | {Asset.EngineNumber} |
| Asset | (define in your Org Customisation Settings) | {Asset.Custom1} |
| Asset | (define in your Org Customisation Settings) | {Asset.Custom2} |
| Asset | (define in your Org Customisation Settings) | {Asset.Custom3} |
| Asset | ICCID | {Asset.ICCID} |
| Asset | In Trip Verb | {Asset.InTripVerb} |
| Asset | Manufacturer | {Asset.Manufacturer} |
| Asset | Model | {Asset.Model} |
| Asset | MSISDN | {Asset.MSISDN} |
| Asset | Name | {Asset.Name} |
| Asset | Out Of Trip Verb | {Asset.OutOfTripVerb} |
| Asset | Project | {Asset.Project} |
| Asset | Project Code | {Asset.ProjectCode} |
| Asset | Registration Number | {Asset.RegistrationNumber} |
| Asset | Run Hours | {Asset.RunHours} |
| Asset | Run Hours (decimal) | {Asset.RunHoursDecimal} |
| Asset | Run Hours (seconds) | {Asset.RunHoursSeconds} |
| Asset | Run Hours (time span) | {Asset.RunHoursTimespan} |
| Asset | Secondary Run Hours | {Asset.SecondaryRunHours} |
| Asset | Secondary Run Hours (decimal) | {Asset.SecondaryRunHoursDecimal} |
| Asset | Secondary Run Hours (seconds) | {Asset.SecondaryRunHoursSeconds} |
| Asset | Secondary Run Hours (time span) | {Asset.SecondaryRunHoursTimespan} |
| Asset | VIN | {Asset.VIN} |
| Asset | Weight | {Asset.Weight} |
| Asset | Year | {Asset.Year} |
| Event | Altitude (feet) | {Event.AltitudeFeet} |
| Event | Camera Event Details Link | {Event.CameraEventInternalUrl} |
| Event | Camera Event Text | {Event.CameraEventTypeText} |
| Event | Date | {Event.Date:default:yyyy/MM/dd} |
| Event | Date & Time | {Event.Date:default:yyyy/MM/dd HH:mm} |
| Event | Date & Time (utc) | {Event.DateUtc:default:yyyy/MM/dd HH:mm} |
| Event | Date & Time Received | {Event.DateReceived:default:yyyy/MM/dd HH:mm} |
| Event | Date & Time Received (utc) | {Event.DateReceivedUtc:default:yyyy/MM/dd HH:mm} |
| Event | Date (utc) | {Event.DateUtc:default:yyyy/MM/dd} |
| Event | Date Received | {Event.DateReceived:default:yyyy/MM/dd} |
| Event | Date Received (utc) | {Event.DateReceivedUtc:default:yyyy/MM/dd} |
| Event | GeoFence | {Event.GeoFence} |
| Event | GeoFence Comment | {Event.GeoFenceComment} |
| Event | GpsFix | {Event.GpsFix} |
| Event | Heading (degrees) | {Event.HeadingDegrees} |
| Event | Latitude | {Event.Latitude} |
| Event | Longitude | {Event.Longitude} |
| Event | Name | {Event.Name} |
| Event | PDOP | {Event.PDOP} |
| Event | Position Accuracy | {Event.PositionAccuracy} |
| Event | Speed (KmH) | {Event.SpeedKmH} |
| Event | Speed (MpH) | {Event.SpeedMpH} |
| Event | Speed Accuracy | {Event.SpeedAccuracy} |
| Event | Tag Battery Voltage (V) | {Event.TagBatteryVoltage} |
| Event | Tag RSSI | {Event.TagRSSI} |
| Event | Time | {Event.Date:default:HH:mm} |
| Event | Time (utc) | {Event.DateUtc:default:HH:mm} |
| Event | Time Received | {Event.DateReceived:default:HH:mm} |
| Event | Time Received (utc) | {Event.DateReceivedUtc:default:HH:mm} |
| General | Current Date | {Now:default:yyyy/MM/dd} |
| General | Current Date & Time | {Now:default:yyyy/MM/dd HH:mm} |
| General | Current Date & Time (utc) | {NowUtc:default:yyyy/MM/dd HH:mm} |
| General | Current Date (utc) | {NowUtc:default:yyyy/MM/dd} |
| General | Current Time | {Now:default:HH:mm} |
| General | Current Time (utc) | {NowUtc:default:HH:mm} |
| General | Duration | {Duration} |
| General | Duration (seconds) | {DurationSeconds} |
| General | Is Start | {IsStart} |
| Trip | Distance | {Trip.Distance} |
| Trip | Distance (meters) | {Trip.DistanceMeters} |
| Trip | Distance (miles) | {Trip.DistanceMiles} |
| Trip | Driver | {Trip.Driver} |
| Trip | Driver Code | {Trip.DriverCode} |
| Trip | Duration | {Trip.Duration} |
| Trip | Duration (seconds) | {Trip.DurationSeconds} |
| Trip | End Date | {Trip.End.Date:default:yyyy/MM/dd} |
| Trip | End Date & Time | {Trip.End.Date:default:HH:mm} |
| Trip | End Date & Time (utc) | {Trip.End.DateUtc:default:HH:mm} |
| Trip | End Date (utc) | {Trip.End.DateUtc:default:yyyy/MM/dd} |
| Trip | End Latitude | {Trip.End.Latitude} |
| Trip | End Location | {Trip.End.Location} |
| Trip | End Location Comment | {Trip.End.LocationComment} |
| Trip | End Longitude | {Trip.End.Longitude} |
| Trip | End Odometer | {Trip.End.Odometer} |
| Trip | End Odometer (miles) | {Trip.End.OdometerMiles} |
| Trip | End Run Hours | {Trip.End.RunHours} |
| Trip | End Run Hours (decimal) | {Trip.End.RunHoursDecimal} |
| Trip | End Run Hours (seconds) | {Trip.End.RunHoursSeconds} |
| Trip | End Run Hours (time span) | {Trip.End.RunHoursTimespan} |
| Trip | End Time | {Trip.End.Date:default:yyyy/MM/dd HH:mm} |
| Trip | End Time (utc) | {Trip.End.DateUtc:default:yyyy/MM/dd HH:mm} |
| Trip | Project | {Trip.Project} |
| Trip | Project Code | {Trip.ProjectCode} |
| Trip | Start Date | {Trip.Start.Date:default:yyyy/MM/dd} |
| Trip | Start Date & Time | {Trip.Start.Date:default:yyyy/MM/dd HH:mm} |
| Trip | Start Date & Time (utc) | {Trip.Start.DateUtc:default:yyyy/MM/dd HH:mm} |
| Trip | Start Date (utc) | {Trip.Start.DateUtc:default:yyyy/MM/dd} |
| Trip | Start Latitude | {Trip.Start.Latitude} |
| Trip | Start Location | {Trip.Start.Location} |
| Trip | Start Location Comment | {Trip.Start.LocationComment} |
| Trip | Start Longitude | {Trip.Start.Longitude} |
| Trip | Start Odometer | {Trip.Start.Odometer} |
| Trip | Start Odometer (miles) | {Trip.Start.OdometerMiles} |
| Trip | Start Run Hours | {Trip.Start.RunHours} |
| Trip | Start Run Hours (decimal) | {Trip.Start.RunHoursDecimal} |
| Trip | Start Run Hours (seconds) | {Trip.Start.RunHoursSeconds} |
| Trip | Start Run Hours (time span) | {Trip.Start.RunHoursTimespan} |
| Trip | Start Time | {Trip.Start.Date:default:HH:mm} |
| Trip | Start Time (utc) | {Trip.Start.DateUtc:default:HH:mm} |
| Trip | Trip Type | {Trip.TripType} |
| Trip | Trip Type Code | {Trip.TripTypeCode} |
Webhook Example - Send Trip Information on Trip End
In this example, the webhook sends the below tokens, containing information about the trip - at the ‘end’ of a trip.
It illustrates the note above, and how we can accommodate for the fact that not all tokens exist at all times.
Asset name: "assetName":"{Asset.Name}",
Asset Description: "assetDesc":"{Asset.Description}",
Asset Code: "assetCode":"{Asset.AssetCode}",
Asset Serial: "assetSerial":"{Asset.DeviceSerial}",
Asset Rego: "assetRego":"{Asset.RegistrationNumber}",
Asset Year"assetYear":"{Asset.Year}",
Asset Type: "assetType":"{Asset.AssetType}",
Device Type: "assetDeviceType":"{Asset.DeviceType}",
Model : "assetModel":"{Asset.Model}",
Driver Name"tripDriver":"{Trip.Driver}",
Trip Start Latitude: "tripStartLat":"{Trip.Start.Latitude}",
Trip Start Longitude: "tripStartLong":"{Trip.Start.Longitude}",
Trip start Date: "tripStartDate":"{Trip.Start.Date}",
Trip End Date: "tripStartDateUTC":"{Trip.Start.DateUtc}",
Start Location: "tripStartLocation":"{Trip.Start.Location}",
Odometer on Trip Start: "tripStartOdo":"{Trip.Start.Odometer}",
Run Hours on Trip Start : "tripStartRunHoursDec":"{Trip.Start.RunHoursDecimal}",
Trip End Latitude: "tripEndLat":"{Trip.End.Latitude}",
Trip End Longitude: "tripEndLong":"{Trip.End.Longitude}",
trip End Date: "tripEndDate":"{Trip.End.Date}",
Trip End Location: "tripEndLoc":"{Trip.End.Location}",
Odometer on Trip End: "tripEndOdo":"{Trip.End.Odometer}",
Run Hours on Trip End: "tripEndRunHourDec":"{Trip.End.RunHoursDecimal}"
Note - {Event.SpeedKmH} provides speed as a whole number eg. 45. 3rd party platforms may require a float/decimal number eg. 45.01. TG does not receive speed data with decimals. To satisfy this requirement, we can hardcode a decimal in the webhook body eg. {Event.SpeedKmH}.01


Alert Conditions
Set the alert to trigger when the asset is “In Trip”

Under the Advanced Tab, check the “Send Notification When Alert Condition Ends” checkbox.
This means you will receive a Webhook message when the Alert Condition Ends, i.e, for the above setup, a message is sent when the asset is “Out Of Trip” (Trip Ends)

Why?
- Trip values - such as trip distance, time, odometer run hours etc are calculated via post-processing (TG runs all datapoints through a processor) after a trip ends.
- This processing is fast, but does take some time.
- If we try to send these token values immediately on trip end - that processing might not always be done - so the ‘Trip End’ tokens, counterintuitively, don't actually exist for an ‘End of Trip’ Alert.
- The ‘Send When Alert Condition Ends’ means that the alert/webhook is generated the record after that - where the data will be present - so all works as intended.
Output
