Getting Started - Trips

Written by Matthew Clark-Massera
Updated at April 2nd, 2026
Table of Contents
Getting Started: Trips
Digital Matter tracking devices support several different ways to start a trip. Input 0 (bit 0) is the Ignition input, and Telematics Guru uses this to determine whether a device is in a trip.
This article covers the key trip-related system parameters, the different trip types you may see, and when to use Trip Based versus Non-Trip Based asset behaviour.
System Parameters
Movement Trips
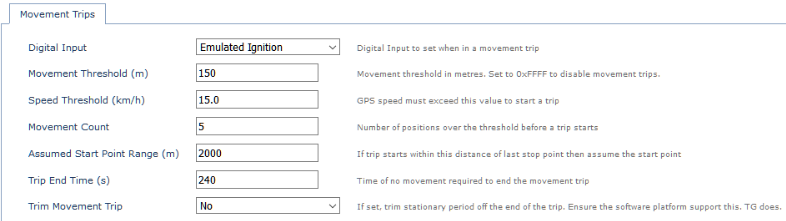
These parameters control how a trip starts and ends when movement-based trip detection is used.
-
Digital Input - Set this to Emulated Ignition (0) to track trips in Telematics Guru, or set it to None to track transported trips instead. See Getting Started - Trips for the broader trip behaviour overview.
-
Movement Threshold - Once the device crosses this threshold in metres, it can start a trip.
-
Speed Threshold - Once the asset crosses this speed threshold, it can start a trip.
-
Movement Count - The threshold must be met for this many seconds before the trip is considered valid. This helps avoid nuisance wakeups.
-
Assumed Start Point Range (m) - If a trip starts within this distance of the previous trip end point, the new trip start point is set to the previous trip end point.
-
Trip End Time - Once the device detects movement has stopped, it waits this long before declaring the trip ended.
-
Trim Movement Trip - If set to Yes, time can be removed from the end of the trip where the device was waiting for Trip End Time to complete.
The software platform must support this. This relates to data field Field ID 15 in the integration documents.
If set to No, the Movement Trip Trimming Amount sent at the end of the trip will be 0.
If set to Yes, this value will be the Trip End Time. The software platform can then subtract this value from the trip length so the reported trip better reflects when the vehicle actually stopped moving.
Logging
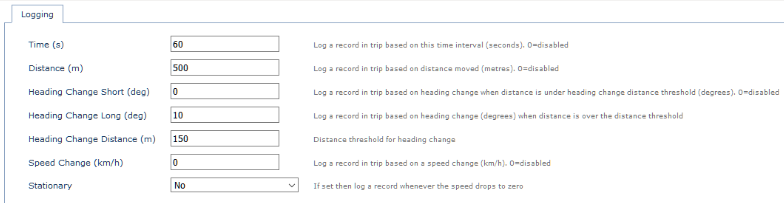
These parameters control when records are logged while a trip is in progress.
Note
Powered devices operate differently from battery-powered devices. On powered devices, the logging rate is also the upload rate. Battery-powered devices can log multiple records before uploading them together.
-
Time (s) - Log a record every time this threshold is reached. Once a single threshold is crossed, all counters restart.
-
Distance (m) - Log a record every time this threshold is reached.
-
Heading Change Short (deg) - Log a record if the heading changes by this amount when the heading-change distance threshold has not been crossed.
-
Heading Change Long (deg) - Log a record if the heading-change distance threshold has been crossed and the asset turns by this amount.
-
Heading Change Distance (m) - Determines the distance used for long and short heading-change logic.
-
Speed Change (km/h) - Log a record when the change in speed crosses this threshold in either direction.
-
Stationary - Log a record if the asset is determined to be stationary.
Types of Trips
There are several ways a device can determine whether it is in a trip.
-
Hardware Ignition Trips - The most common method is wiring the physical ignition line to the white wire on the device, which is the ignition input on devices such as the Dart, G60, and G100. This ignition input is then used to start and stop trips.
-
Emulated Ignition - The device uses GPS-detected movement to emulate ignition and start a trip.
-
Run Detect - The device can monitor external voltage and use thresholds to determine whether the engine is running. The assumption is that when the engine is running, vehicle battery voltage is slightly higher.
-
Other - Some devices and firmware versions support other trip-detection mechanisms. For example, a Remora can be configured to use accelerometer activity to emulate trips.
-
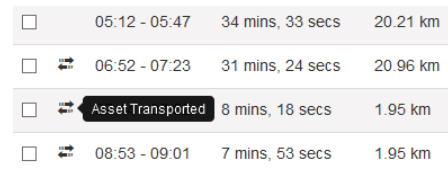
Transported Trips - If the device detects movement and is not already in a trip, it can start a movement trip. If the device is not configured to map movement trips to the Ignition digital input, Telematics Guru will still show the trip in the Trip List, but it will be marked as a transported trip. This is commonly seen when equipment is towed or moved on a trailer or flatbed.
Tracking mode overview
For more information on tracking types, see Edge Device - Tracking Modes.
Trip Based Assets Versus Non-Trip
When a device is in trip, Digital Input 0 (Ignition) is typically set, and the trip state status flag is set to 1. This status flag appears as Digital Input 24 in Telematics Guru.
It often makes sense to treat assets that report infrequently differently from assets that report frequently. For example, it may not make sense to display an asset that only reports every 12 hours on the Trip History map view and connect straight lines between those positions. In that case, it is often more useful to show each location as an individual point.
The key differences are:
-
Icon Colour
Trip Based: The icon colour on the map is red when not in trip and green when in trip. The verb in the asset list also changes.
Non-Trip Based: The icon stays red at all times.
-
History
Trip Based: Uses the Trip History map view, which shows trips and joins the points within each trip to show the path travelled.
Non-Trip Based: Uses the Point History map view, which shows each logged position as a separate point.
-
Street Address Lookup
Trip Based assets perform a street address lookup on the start or end of trips.
Non-Trip Based assets perform the lookup on each heartbeat.
Address Lookup
To read more about address lookup behaviour, see Telematics Guru - Asset Addresses.
Choosing Between Trip and Non-Trip for Your Asset
Each device type defaults to either Trip Based or Non-Trip Based behaviour. Some device types can be changed, while others cannot.
| Only Trip Based | Both | Only Non-Trip Based |
|---|---|---|
|
All powered assets are Trip Based and cannot be changed to Point Based.
|
These device types can operate either way.
|
These device types are Non-Trip Based only.
|
To change an asset between Trip Based and Non-Trip Based in Telematics Guru, go to the Assets module, open Manage Assets, select the asset or click the cog and choose Edit. The checkbox is in I/O Mappings for device types that support the change. See Creating Assets in Telematics Guru for the broader asset setup flow.

Set Periodic Tracking Only
To change an asset to periodic tracking only in OEM/Device Manager, set the relevant system parameter in the Advanced Tracking area so that periodic-only tracking is enabled.

Periodic Tracking
For more information on setting a device to periodic tracking, see Periodic Tracking.
Next Steps
For the main trip overview, see Getting Started - Trips. If you need help with asset address behaviour, see Telematics Guru - Asset Addresses. If you are configuring assets in Telematics Guru, see Creating Assets in Telematics Guru.