Setting up a Yabby Edge LoRaWAN device via ChirpStack

Written by Matthew Clark-Massera
Updated at February 3rd, 2023
Table of Contents
1. Setup your Yabby Edge LoRaWAN devices using the LoRaWAN Provisioning Tool
The LoRaWAN provisioning tool can be downloaded here.
Please see Yabby Edge LoRaWAN - Configuration and Usage.
Note: It is important to configure the Region and Scanning parameters.
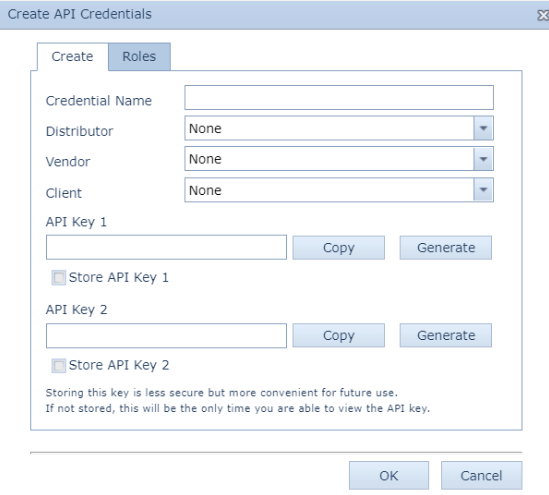
2. Setup the API Credentials on OEM
Navigate to the 'Manage' dropdown on OEM and click on 'API Credentials'. Select 'New' and generate the API key. Once created the key can be copied. Both Key 1 and Key 2 will need to be generated to save the API credentials. Once both are generated, select 'OK' to save them.
3. Add your integration in ChirpStack
An HTTP integration will need to be set up to send device data to the location engine to resolve the location. You will need to send the data to our Location Engine in a ChirpStack format and also be able to receive downlinks that get sent back down to the device. This integration would be done on your side.
ChirpStack Downlink format: https://www.chirpstack.io/application-server/api/http-examples/
ChirpStack Uplink format: https://www.chirpstack.io/application-server/integrations/events/#up
The Base URL: https://oem-event-processors.azurewebsites.net/api/LoraChirpStack
Header will need to be input at Authorization
The value will be Bearer and then the API Key generated in Step 2 above.
4. Add application server security details on OEM
- Navigate to 'Manage' dropdown on OEM and click on 'LoRa Network Credentials'
- Click 'New' to create a new entry
- Select the relevant Distributor/Vendor/Client
- Enter a name for the network credential entry
- Select 'ChirpStack' from the LoRa Network Code dropdown
- Enter the API token and API URL from ChirpStack

5. Create a Forwarder on OEM
This step is only relevant if you need to forward data to your own platform. Forwarders for Telematics Guru are already created.
A Forwarder is an HTTP connector which allows the Location Engine to forward the "solved" device data to an end platform. Browse to Forwarders on OEM and click 'New'.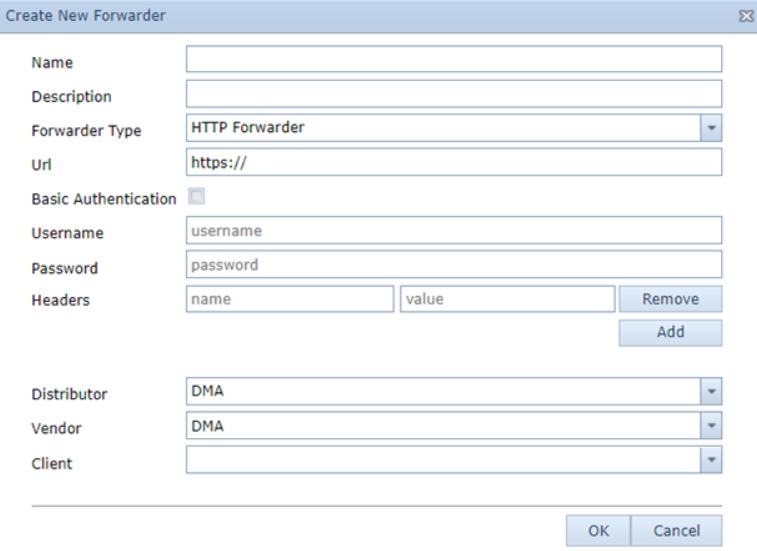
6. Set the Location Engine Lookups and Forwarder
Browse to LoRa Devices on OEM and select your devices.
- Click on 'Device Operation' and 'Set Network Credentials'. Select the entry you created in Step 4.
- Click on 'Device Operation' and 'Set Location Engine Lookup Settings'. Select Default Profile. This profile will cover 99% of use cases. Test on this profile initially, if you have specific requirements, speak to your support team to have the profile adjusted if this is required.
- Click on 'Device Operation' and 'Select Forwarder'. Select the TG forwarder for your region or the entry you created in Step 5.