Scheduled Reports in Telematics Guru
Table of Contents
Scheduled Reports
Reports can be scheduled to run at a pre-configured interval, at most once a day. These reports will then be sent to recipients of your choice via email. These scheduled reports are highly configurable, and can be, for example, set to send only if the report has data in it.
Setting Up a Scheduled Report
Let us use an example wherein you would like to schedule the Daily Run Hour Usage Report on a daily basis. This could be useful from a management perspective to determine which assets are being used more than others, or which assets are being used more than they should.
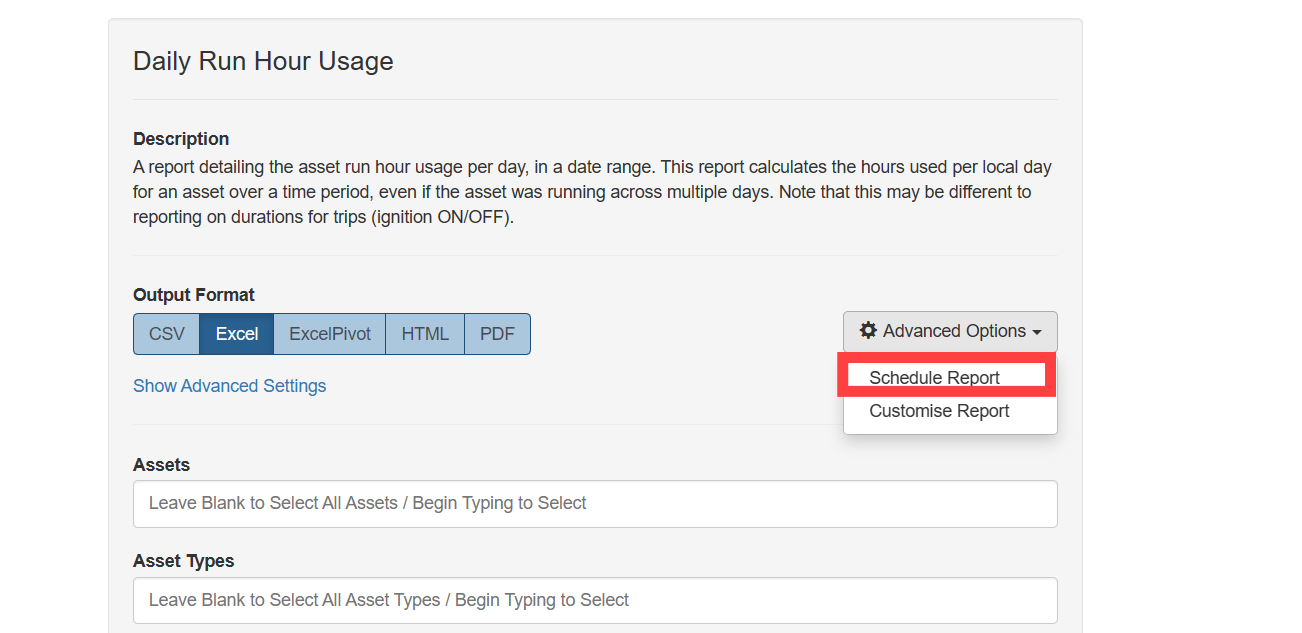
To do this, you would start by selecting your report of choice, which is the Daily Run Hour Usage Report in this case. From there, you would want to select Advanced Options → Schedule Report, as seen below:

From there, you will be presented with a pop-up containing various tabs, each containing relevant options. Most of these settings will be the same as those possible for the standalone report. There are extra settings, however, to ensure the report you receive is as you desire.
Scheduled Report Date Range
The data range parameters for the report are mostly self-explanatory. These are used to determine the data range for the data being used in the report. You would generally want this to align with the frequency of your report"s scheduling.
In this case, since we are intending to have a Daily Run Hour report for each day, we would set it as follows:

The Show Unused Assets box simply means that assets that have generated no entries for the report for that time period can be elected to be ignored if desired.
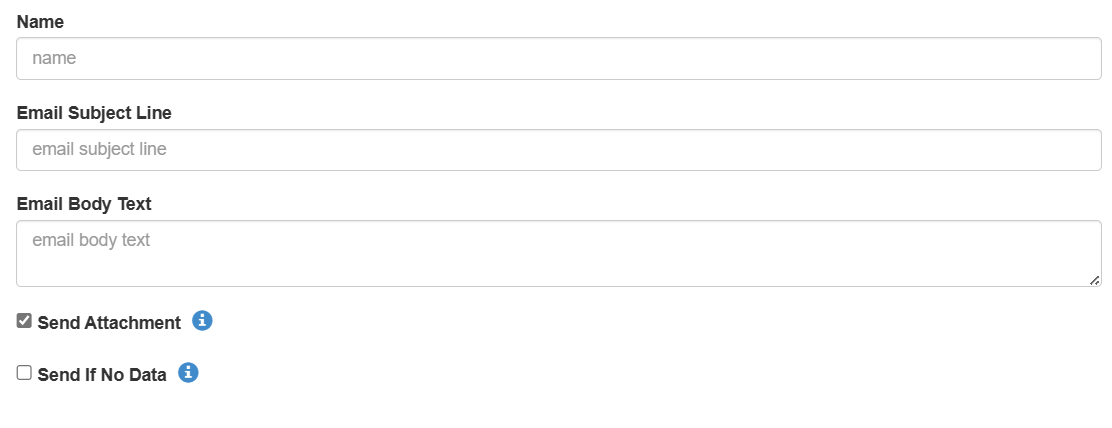
Similar options for filtering exist for scheduled reports, such as the Send If No Data, which allows that you can configure the scheduled report not to send if it is empty for the configured date range.
The General tab also allows for you to specify the details of the email to which your report is attached in its chosen format:

Other parameters allow for you to select the frequency at which you receive your report, and what time of day it occurs. You can, for example, set it to send on certain days of the week. The report will send at the time configured, based on the timezone of the user the report is being run as under the Advanced tab.
Scheduled Report Logs
The scheduled report logs allows for debugging when scheduled reports do not send successfully. The reason is included in a pop-up when hovering over the exclamation mark.
You can also download any failed reports from this page if desired.
Running the Report via API call
Scheduled reports can also easily be run via API call. Please note that reports have to be created as a scheduled report on Telematics Guru in order to be called via the API.
In order to use this API, you first need to authenticate using your login details for Telematics Guru.
To do this, you must POST to https://api-<<insert-instance-here>>.telematics.guru/user/authenticate, where “instance” refers to the Telematics Guru server you are on. A user on the EMEA03 server would use https://api-emea03.telematics.guru/user/authenticate. The following body (x-www-form-urlencoded) must be used:
| Key | Value |
|---|---|
| username | Your Telematics Guru username |
| password | Your Telematics Guru password |
| grant_type | password |
| otp | Your authenticator app one time pin |
The last key and value are optional, and depend on whether you have 2-factor authentication enabled.
After posting this, you will receive a bearer token. This token must be used as the authentication bearer token for the following messages.
To retrieve a specific scheduled report, you need to GET https://api-instance.telematics.guru/scheduledReport/OrgID, which will return a full list of scheduled reports for an organisation with their specific scheduled report IDs.
You can retrieve the OrgID using the API call https://api-instance.telematics.guru/user/organisation.
You can get a specific scheduled report using GET from https://api-instance.telematics.guru/scheduledReport/OrgID/run/ScheduledReportID, where Org ID is the organisation ID, and ScheduledReportID is the ID of the desired scheduled report.
You will either get one of the two responses:
204 - No content, the report is empty
200 - CSVCONTENT
The idea behind this is that you will be able to use the API to call a previously setup scheduled report as much as is needed.
This currently only works for .csv output.
Please contact support if you receive an error when attempting to call the report.
cURL Example of Calling Scheduled Report
Following the above steps, here is an example of the process required to run the scheduled report using the API in cURL format. This example uses Telematics Guru instance EMEA04.
Authentication
curl --location "https://api-emea04.telematics.guru/user/authenticate" \
--header "Content-Type: application/x-www-form-urlencoded" \
--data-urlencode "username=Your Username" \
--data-urlencode "password=Your Password" \
--data-urlencode "grant_type=password" \
--data-urlencode "otp=Your one time pin"
After this, you will receive your valid bearer token.
Retrieving Organisation ID
curl --location "https://api-emea04.telematics.guru/user/organisation" \
--header "Authorization: Bearer (Your Bearer Token received in the previous step)"
After this step, you will receive a list of the organisation IDs for all the organisations visible to your account.
Retrieving List of Scheduled Reports
curl --location "https://api-emea04.telematics.guru/scheduledReport/1" \
--header "Authorization: Bearer (Your Bearer Token)"
This will return a list of all scheduled reports available under the specified organisation, with 1 as the example organisation ID here.
Running the Scheduled Report
curl --location "https://api-emea04.telematics.guru/scheduledReport/1/run/9183" \
--header "Authorization: Bearer (Your Bearer Token)"
This step will return the .csv scheduled report as requested, or a 204 message saying that the report is empty. In this instance, 9183 is an example scheduled report ID.
